Tag Archives: Renovating

Queenslander homes

A Queenslander home from the 1880s

I have just moved back to Queensland, Australia (QLD) after 21 years. The last time I lived in QLD was for university and when I finished in 2000, I had secured an amazing graduate opportunity in Melbourne and couldn’t have left fast enough. I was an adult, I had a degree, a job and the world was my oyster!

Fast forward to today and I have lived in Melbourne, London and Sydney, met my wonderful husband and had three beautiful children. And whilst living in London for the second time, my husband and I decided it was time to finally go “home” and give our children the lifestyle we grew up with. Sunshine, a big backyard, a pool if we were lucky and most importantly, grandparents, cousins, aunts and uncles.

So here we are in Brisbane and I have fallen in love all over again with the Queenslander house. I’ve never lived in a Queenslander and never thought I would but walking past these magnificent beauties every day on my strolls around the neighbourhood has made me want to embrace fully our return home, including living in one of these glorious old houses.

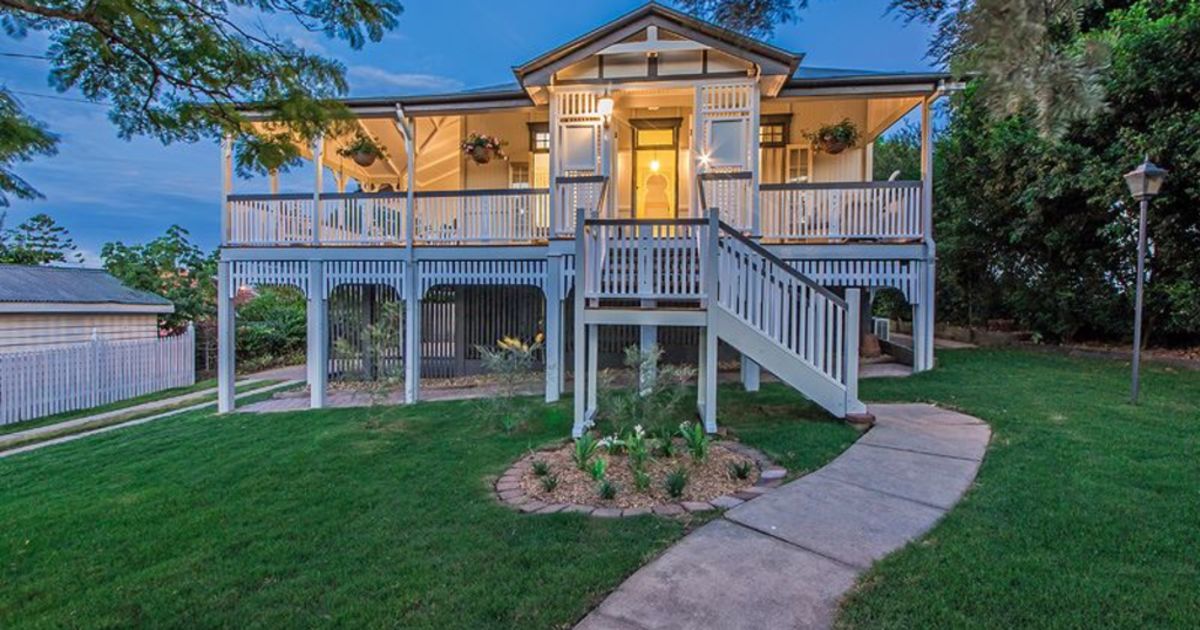
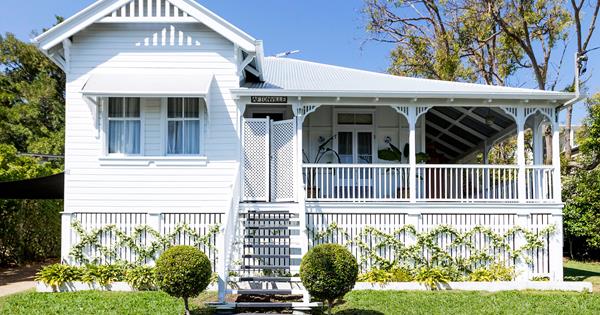
The Queenslander style home started being built in the late nineteenth century, making some of these homes over 100 years old, and is considered the most iconic Australian architectural style. The traits of a Queenslander are:

  • Single level home, detached on a separate block of land
  • High set on stilts
  • Made of timber with a corrugated roof
  • Large verandah extending around the house but not usually enclosing it
  • Decorative features such as cast iron or timber balustrades and coloured glass windows

While this style of architecture at first seems based on an aesthetic desire (because it’s so pretty!) in actual fact every feature was born from environmental and climate requirements, in addition to available building resources and the lifestyles of the time. This type of architecture is called “vernacular architecture”, where traditional or indigenous architecture has evolved over time based on local needs.

Stilts

To explore these features further and the reasons they were developed, lets start with the single level home set high on stilts. Queensland is HOT. It is so hot I didn’t think I could ever live here again, especially with my freckled skin and red hair. Before electricity and air conditioning, the houses were designed on stilts and stand alone to attract every small gust of wind under and around to cool the house down. The stilts also lessened the risk of the timber home above being attacked by termites.

Queenslanders are made from timber, which was cheap at the time and usually readily available from trees onsite. Long planks of timber were overlapped in a clapboard or weatherboard style giving excellent insulation for the humid climate. The timber and corrugated iron sheeting for the roof do not retain heat so are perfect for those hot summers over 40 degrees. Many in the northern hemisphere may be shuddering at the thought of cold winters in these cool houses but temperatures, certainly in Brisbane, usually bottom out at a mild 9 degrees in the evening.

Clapboard timber and the verandah

The large verandah allows that idyllic inside / outside lifestyle whereby windows and doors can be left open to capture the breeze whilst being protected from sun and rain. The verandah usually wrapped around most of the house and gave views over the garden, offering another living zone to the home.

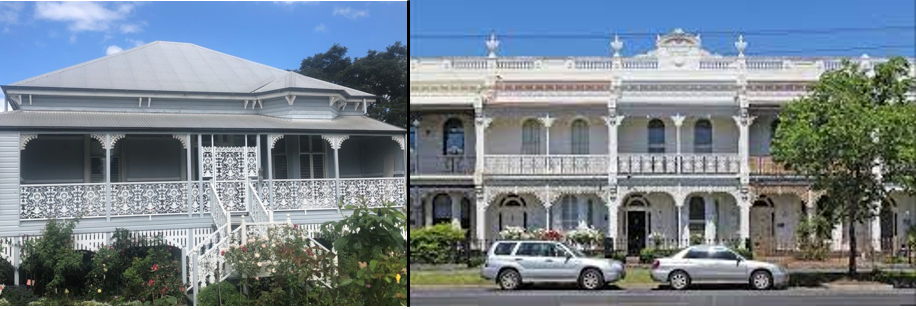
The verandah and façade of the house usually had charming details such as balustrades and fretwork. Interestingly whilst these Queenslander houses were initially designed out of necessity for the climate and access to local and cheap building materials I suspect over time as these houses were built by more affluent families the decorative features were inspired by Victorian terraces, preceding the Queenslander style by 30 years in Australia.

Queenslander v Victorian Terrace

However, the Queenslander has evolved in modern times. Many are “lifted” and a ground floor built underneath to maximise space. Partial enclosure of verandahs has occurred, starting with the aptly named “sleep-out”, which was probably a bit breezy, to now complete inclusion within the house structure. Blocks (plots or lots) have been subdivided to capitalise on increasing land values and neighbours can peer into each others homes as dwellings are built mere metres apart. And as some of these beautiful old homes are extended to maximise space, some renovations are more sympathetic than others.

The Queenslander is the most iconic Australian house style ever built. And whilst practical it is also beautiful. It captures perfectly the style of living in this hot climate where families live seamlessly inside and outside, eternally escaping the unforgiving sun and occasional tropical rains. I hope they continue to be preserved as the demands of increased housing prices and building costs influence our historical streetscape. And I dream of living in my very own one day, continuing the custodianship of these beautiful and functional architectural masterpieces.

Will this property be a home or an investment, now and in the future?

interest-only_1

This is the fourth and final post in my introduction to personal property finance series. A very clever friend of mine commented on a previous post when discussing fixed v variable mortgages, that you can have a number of fixed mortgages. For instance, if you’d decided to fix $150k of your mortgage, you could get 3 x $50k fixed mortgages, which would allow you to repay more principal. Many financial providers restrict the amount of principal you can repay on a mortgage. So if the limit was $10k for mortgage, if you had three fixed mortgages, you could repay $30k of your total $150k fixed mortgage. Splitting your mortgages could also provide more flexibility if you wanted to fix some for one year, some for two years, and so on.

However… this is if you want to repay principal. Many people falsely assume you have to repay your mortgage and that repayments have to include principal and interest (P&I).

Now you’re probably thinking… but then I am not paying down my mortgage and I’m not “getting ahead”, or why would I want to pay the bank all of that interest?, or I thought those sort of mortgages were only for investors… Let me answer all of your concerns and show you that having an Interest Only loan is the best option for you.

First and foremost, your monthly repayments on a P&I mortgage will be higher than Interest Only. On a $100k mortgage where the interest rate if 4.69% and term is 25 years, your P&I repayment is $566.67 (P $175.84 & I $390.83). On the same mortgage, your interest only payment is $390.83. You save $175.84 a month!! When calculating how much you can repay (see previous post “What mortgage payments can I comfortably afford?”), an interest only loan may mean you could comfortably borrow more.

Secondly, if you have an offset account you don’t need to repay principal. See my previous post “What is my risk appetite regarding fixed versus variable mortgages?” for an explanation of offset accounts. If I have a $100k mortgage and $20k in savings in my offset account, this means I only pay interest on $80k. My monthly payments are even less $312.67, and my principal has been reduced by $20k. With a P&I mortgage, I am out of pocket $566.67 in the same month, and I have only repaid $175.84 of principal!! It would take almost 8 years to repay $20k via P&I repayments.

While you are not technically “repaying principal” or “paying off your mortgage” with an interest only mortgage with an offset account, you are reducing the principal amount of the loan, and therefore paying less in repayments.

So maybe you think… well that’s fine but I don’t have a spare $20k to stick in an offset account… even if you only have $1k in your offset and you deposit some small savings each month, you are a lot better off than trying to pay P&I. The more savings you deposit in your offset, the lower your mortgage payments are (incentive!) and you will pay less and less interest to the bank.

The big seller for me on an interest only mortgage with an offset account is the savings you deposit to reduce your principal is YOUR MONEY. You can do with it what you like, you can take it out when you want, and you can put more or less in each month. You can deposit $20k in your offset account and decide a few months later you want to renovate your bathroom. In the meantime you have reduced your monthly payments dramatically AND still have access to YOUR money. If you are repaying P&I, you cannot withdraw that $175.84 of principal. In time you can draw down equity on your home but that is a much more complicated process than transferring some funds from one account to another in your internet banking and hey presto! you’ve got $20k to spend on your renovations.

And finally, the question some people don’t ask themselves when buying a property is… “will I ever rent out this property” …what happens if work posts you interstate, a relative gets sick and you move to care for them, or even that you are lucky enough to buy another property to move into without having to sell the current one… your property could end up being an investment and rented out. If there is any chance this is a possibility, you should strongly consider an Interest Only mortgage as only the interest portion of your mortgage payments will be tax deductible. This leads us into a bigger discussion with regards to “gearing”, which I will cover in the next post.

So really, it’s a no brainer! Interest only mortgages are cheaper, may allow you to comfortably borrow more, with an offset account offer the ability to reduce principal significantly faster than repaying principal each month, and gives you access to that principal any time you want it, all while providing the flexibility for the future with regards to renting the property out as an investment. I promise you’ll be “getting ahead” a lot faster with an Interest Only mortgage.


Note 1: I found a few handy mortgage payment calculators: http://www.planabettermortgage.com.au/loan-calculators/p–i–interest-only.htm or http://www.infochoice.com.au/calculators/principal-and-interest-calculator/


Note 2: There has been vigorous discussion lately from various politicians that they want to get rid of Interest Only mortgages as they think they are contributing to Australia’s property “bubble”, however these mortgages are still widely available.

Renovating: Pleasure AND Pain

IMG_6844

My lack of posts recently has been due to our renovations draining every last drop of energy from me, particularly in the last few months. I took a very unscientific survey of everyone I know who has done a renovation and almost everyone hyperventilated when I asked how it went. Or more importantly, how it finished.

Because if you can’t physically do every single task yourself, or your tradespeople are not closely related to you, you have to deal with tradespeople. I’m throwing some big stereotypes out here, but unfortunately a lot of tradies are difficult, unreliable, dishonest, lazy and walk off the job when it’s 90% complete leaving you tearing your hair out and them with their profit margin.

Alright alright alright I don’t want to bash the tradies, our plumber was a super lovely guy, as was our chippie, who did some beautiful work. In the past I’ve had some nice tradies do a good job, on time and for the quoted price. But then there are those who threaten to trespass on your property to remove the pavers they laid because they think you haven’t paid them when in fact their bookkeeping is lousy. Or a renderer who took 8 weeks to tell me finally that he wasn’t going to give me a quote, after me daily chasing him with urgency. And he drove a Ferrari. Man am I in the wrong business!

IMG_6845

So the pain in renovating comes from dealing with some tradies. And the bigger the job, the more tradies you have and the more complicated it gets to co-ordinate it all. Which is what the builder should do, but again, he is another tradie himself, fraught with all of the same issues. Then there is pain in the time it takes and the tens of thousands of dollars you fork over every week, for what seems like an eternity. And don’t forget to double the time and cost estimates – always a good benchmark to start with lowering your expectations.

Gosh, hardly seems worth it!… but then there is the pleasure. Seeing your rundown, dark and old-fashioned house being transformed into your vision. Seeing the walls come down, the light come in and the spaces widen and open up. Experiencing the excitement when all of those bathroom fittings you picked months ago while trying to visualise how they look together finally get installed and you realise you are going to use a shower for the first time anyone has ever used it. Enjoying the slightly offbeat blue colour you picked for the walls look magnificent and better than you could have hoped for. And finally, when the floors are laid, the lights installed and the dust all cleared away, realising what you’ve achieved and cherishing this beautiful space that is inviting and warm.

IMG_6847

There is no renovation without pleasure and pain. I almost feel like I couldn’t go through it again, but know I most certainly will. And the next renovation will be even better due to the hard lessons learned. Just not for another 10 years!

IMG_6834

#8 I love Brick

Brick-Anchorman

Brick is my favourite character in the film Anchorman. Brick loves lamp. I love brick. Well I don’t know if I would go that far but I never knew there was so much to know about bricks! I drove an hour this week to a few brickyards to select recycled bricks for our feature wall, and what a learning experience!

When we were planning our recycled brick feature wall a number of sources indicated this would be a large expense. Seeing as we’re sticking very tightly to our budget we forlornly approached our builder expecting to end up with a rendered brick wall, but we were pleasantly surprised! Recycled bricks can be much cheaper than new bricks, and there is no difference in the labour cost. Let me explain further…

Bricks can be made one of two ways:

  1. Extruded: mass produced by pressing through moulds
  2. Dry Pressed: each mould is filled and pressed individually

Extruded is cheaper.

Bricks are classified into two types:

  1. Common: where the colour does not matter, often used in foundations and for rendered walls. Also referred to as “off colour” or “reject”.
  2. Face: where colour matters, and this ranges from browny red to yellowy blonde and the darker blue/black.

Face bricks are more expensive.

In addition there are new bricks and there are recycled bricks. Bricks that were laid pre 1940’s / 1950’s were laid with limestone rather than cement. It is the limestone that can be fairly easily chipped away without damaging the brick that means these really old bricks can be recycled. Old houses and buildings that are being demolished can sell these pre 1950’s bricks to a recycled brick yard who will clean them up and sort them into colour. When choosing recycled brick you either have to take whatever is in the brick yard at the time or be prepared to wait a while for more rarer colours or larger quantities. Recycled bricks can vary in price and they can be a lot cheaper than new bricks.

Then we get down to how much bricks cost. The Brickies I spoke to gave these guide prices:

  • An extruded common new brick can cost $0.65/brick
  • A dry pressed common new brick can cost $0.85/brick
  • A recycled common brick can cost from $0.90/brick
  • A recycled face brick can cost around $1.30 – $1.50/brick but up to $3/brick for rarer colours
  • A new dry pressed face brick can cost up to $2.20/brick

And there is no difference in the labour for laying new or recycled bricks. Another interesting tidbit I learnt was that bricklayers have to work from multiple pallets of brick at a time because no one pallet (even for new single colour face bricks) is completely uniform. Therefore they lay some bricks from one pallet, some bricks from another pallet and so on to ensure a certain inconsistent consistency.

So there you have it, bricks in a nutshell. Go ahead and plan your recycled feature brick wall. One last tip, I would recommend checking first with your builder what they have in their budget for bricks as we discovered our builder had budgeted $1/brick but the ones we chose are $1.50/brick. More later on contract variations…


#6 Renovating: the cost and time of getting council approval

photo

We’ve just spent $17,000 on our renovations and we haven’t even laid a brick yet.

Let’s put mortgages aside for a bit. As I mentioned previously, we are renovating our house, however the actual building work only just started last week. It has taken eight months to get plans and council approval, a lot longer and more expensive than I anticipated. Saying that, I really had no idea having never been through this process before, hence why I would like to share my experience with you so that you are somewhat informed when undertaking the same.

The renovation consists of a small rear extension including a deck, redoing the downstairs bathroom and laundry, repainting inside and out, and installing new flooring and lighting downstairs. The property is in the City of Sydney council in NSW, Australia. I shopped around where I could on prices so this is probably the low end of the scale, I am sure for bigger jobs the architects fees alone could be in the tens of thousands!

Preparing the plans

The first meeting with my architect was 15 November 2013 and we started with discussing my requirements. My architect then started drawing up the plans. In order to do these properly we needed a structural engineer to advise on the extension (structural beams where walls are being removed, concrete slab footings etc) and a civil engineer to advise on relocation of services (water, sewerage etc pipes around where the extension will be). In addition, to be able to draw up the plans accurately we needed a property surveyor to provide measurements of the property and boundaries. Just to get the plans drawn ready for council submission it cost: architect $2,000, engineer $3,000, and surveyor $1,700. Lets now refer to the completed plans as the Development Application (DA).

There is another type of application called a Complying Development Certificate (CDC), which we were hoping to go for as it is a simpler process, however our house is in a Heritage Conservation area so requires a more detailed application.

Then we had to pay a few miscellaneous fees and charges that don’t add up to much however I have explained these briefly:

  • Form 149: provides information about zoning, subdivisions, and easements. This cost $80
  • BASIX certificate: required for DA’s in NSW for projects greater than $50k, which assesses the sustainability of the project with regards to water consumption, greenhouse gas emissions and thermal performance. This cost $25
  • Building Plan Approval application fee: I have no idea what this is but it cost $17.01

Then came the confusing part of using a private certifier. I thought we were just drawing up some plans, sending them to council and waiting what seems a lifetime for approval… However before we can make submission the DA is assessed to ensure it meets town planning and environmental requirements. Actually you can get council to do this instead but I was assured by my architect that where a certifier can do the job they are both quicker and cheaper. I like that! The certifier charged $3,300 and took one to two weeks. The report also referred to the Heritage Conservation requirements for the area, for e.g. with regards to the appearance of the extension, even down to the exterior paint colours we were using.

Submitting the Development Application

Now we were ready to submit our DA! After going to the town hall office with my architect and the council town planner requesting more (seemingly unnecessary) information, we finally made our submission and paid more money. The DA is for small scale residential projects such as alterations, additions and carports. The application fee is calculated in two parts: 1. The cost of the project, which for a 50-250k project is calculated by a base of $352 plus $3.64 for every $1k over $50k, and 2. An advertising/notification fee of $535. All up we paid $1,240. We submitted the DA on 17 March 2014, five months after I first met with my architect.

Then the waiting starts… the council has to notify all residents in the area of the DA, advertise the DA on the property, and provide the means for which residents can inquire or complain about the DA for a period of four weeks. After this the council planner will then review the application. This took another three to four weeks and some phone calls from my architect and myself to chase the process along. And you hope your DA comes back approved otherwise this takes even longer!

During this period my architect worked on the construction documents, which provide a greater level of detail to the DA plans, which the builder uses. An example is where ceiling lights will be placed, which lights will be on the same switch and where that switch will be located. These documents are optional but I saw three major benefits: 1. It forces you as the client to nut out all of your requirements up front. You don’t necessarily have to pick the exact location and number of ceiling lights at this stage, but it is pretty close, 2. It provides a good level of detail for builders to provide accurate quotes, and 3. It is a record of your requirements that is set at the start of the job so any disputes with the builder should be easily resolved. Of course this costs more money, but money well spent I believe. I paid the architect a further $1,700 for the construction documentation including managing the builder tender process.

We received council approval 9 May 2014, almost eight weeks after submission. The DA was returned with some pretty standard additional requirements, including dilapidation reports on the properties either side. The report documents the condition of the properties, i.e. cracks in the walls etc, which the council/certifier uses to understand if any of our work will affect the structural integrity of the bordering properties. This cost a further $1,100 from the structural engineer.

Tendering for a builder

My architect then submitted the construction documents to a number of builders for the tender process, requiring quotes within four weeks. We waited for the DA approval to do this in case any major changes were required to our plans. After receiving a number of quotes my architect reviewed and analysed these in order to select the best builder for the job. We met with the builder to discuss the project details and price and then signed the contract on 27 June 2014.

Getting the Construction Certificate

Right, so now we’re ready to go! Or not, it seems. More waiting and money required still. We then needed a Construction Certificate, which is used to verify before beginning the project that the work complies with the Building Code Australia, the design and construction work is consistent with the DA, assesses any conditions in the DA, and checks all fees have been paid and insurances obtained. This was completed by a private certifier (although can be done by council too) and cost a further $1,100 plus $1,320 for critical stage inspections throughout the project.

In order for the certificate to be given my builder had to apply for specific project insurance. There was a backlog of applications, so this took a bit longer than expected. And I had to pay one final fee – the Long Service Levy (LSL) of $516.06. When I researched what this was I nearly fell of my chair! I’m sure many a builder will argue with me but this sounds like some sort of legacy union hooey. The LSL is charged on projects >$25k, calculated by 0.35% of the value of the project including GST. The money is paid into a fund, which makes long service payments to building and construction workers. Hmmm.

Building work

The builders started on 7 July 2014 with internal demolition work while we were waiting on the Construction Certificate, which has now been received and major demolition can now commence. The builder estimates 13 weeks of work, but we shall see…..

#2 All roads lead to Home…

IMG_0207

At the age of 21 with a small deposit saved up from casual jobs during school holidays and while at university, I eagerly searched for my first property.  I was living in Melbourne at the time, having moved there for my first job out of university, and spent the better part of a year getting to know the inner city suburbs while on my search. I ended up finding an old, unrenovated but decent two bedroom, one bathroom, no carspace apartment in a 70’s brick building in North Melbourne. I negotiated the price to $210,000 and with my 10% deposit approached my bank. In hindsight I should have tackled that process the other way round. My bank refused to provide me a mortgage with the advice to “find something cheaper”. Not very helpful.

Needless to say I was a little put off. Being a fatalist, in hindsight it wasn’t the right time for me to buy. I then went on to rent for the next seven years, moving country and cities twice. I ended up in Sydney with a nice deposit saved from a few years living in London converted to AUD with a very favourable exchange rate. I then repeated the same process that I had done in Melbourne, getting to know the inner city suburbs of Sydney, looking at houses and apartments, renovated and in badly need of, in a broad price range and across many suburbs, up to 12 properties every Saturday for seven months until finally I found a house I wanted to buy, could afford and wasn’t swiped out from under me at a heated auction. The house was pretty dated but in a “growth” suburb and after much negotiation on price with a real estate agent who was quite frankly sexist (its not the 60’s anymore mate) I finally became a proud homeowner, settling the day after my 29th birthday.

I then spent the next 18 months slowly renovating my new home. I had bought a 100 year old Victorian terrace that had been stripped of all its beautiful period features, was stuck in the 70’s and was, shall we say, very “Mediterranean”. I had the front facade rendered (over the stucco, nice) & repainted, the porch retiled, the backyard landscaped (previously entirely concreted), a new kitchen relocated and installed, the upstairs bathroom redone, and repainting inside (mostly to remove the 40 years of smoke stains and smell).  In addition, I and my then boyfriend, now husband (now that’s love!), painstakingly stripped the staircase of carpet, carpet nails, vinyl treads and some sort of tar-like glue, metal kick plates and three layers of paint. What a nightmare! Where I could save money I (and my family and boyfriend) did as much of the work as we could.

My boyfriend then bought a fabulous warehouse apartment in a very trendy part of Sydney and I moved in with him, leaving my house partially renovated and leased to tenants. Being a landlord can be an interesting experience, but that is a discussion for another post!

After getting married and having our first baby we find we need more space so are moving back to our house, but not before we finally complete the renovations. We’re in the process of tendering for a builder now so I expect many a funny, trying, learning and/or just plain crazy anecdote to come out of that process!